Raspberry Pi Setup |
|
To gain access to revision questions, please sign up and log in.
a
Visit Farnell and type Raspberry Pi into their search box. You will find everything you need on their site. You may well be able to save some cash by shopping around.
This was our starter kit ...
These instructions assume you are using Windows to make the boot card.
cWe used an 8GB SanDisk SDHC Class 4 Card. 4GB is OK. 2GB is really too small.
dDownloading to a hard disk speeds things up as the image file is large and needs to be unzipped.
View the Downloads Page for more information.
Download the Raspbian "wheezy" image file and unzip the img file.
eCAUTION: Neil accidentally turned his USB Stick into a Raspberry Pi boot disk. Bad idea!!!
He did have a backup but it took a long time to restore all the files and a special formatting tool was needed to repair the USB Stick.
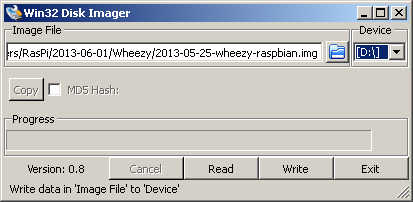
Download Win32DiskImager and use this to burn the boot image. Get the drive letter right or you might repeat Neil's error above.
It looks like this but double check your drive letter! Click the Write button to create the bootable card.
On your new boot card, use wordpad to edit config.txt to work with bog standard VGA monitors. Remove two # symbols as shown. Newer monitors and HDMI TV connections will most likely work without this step.
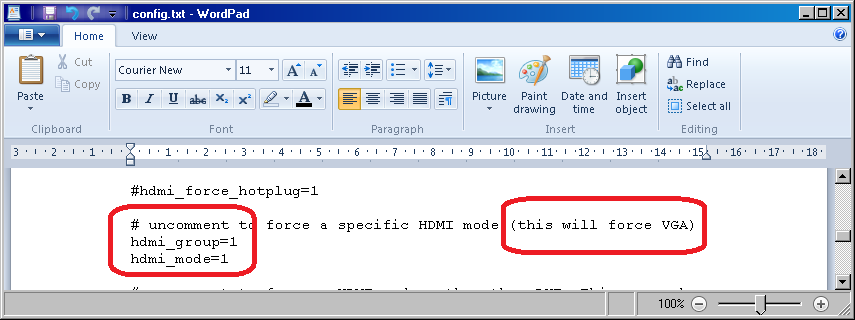
After your installation is complete, try un-editing it to get a higher screen resolution if your monitor will support it. Put the # symbols back in.
Be sure to save as .txt or the Microsoft formatting codes will stop this file working. If this is problematic, copy the text, paste it into Notepad and save it from there.
gYou should see some text scrolling past as the Pi boots up. Then a setup screen is displayed.
You can change all these options later if you need to by typing
sudo raspi-config
Login
The default username is pi
The default password is raspberry
startx
A window based desktop should appear.
After having a play, click the bottom left (start button) and select Log Out.
kType the magic command to shut down the Pi and press enter.
sudo shutdown -h now
reviseOmatic V3 Contacts, ©, Cookies, Data Protection and Disclaimers Hosted at linode.com, London